Imagine your garden bursting with lush hydrangeas, their magnificent flower clusters gracing every corner. A long, vibrant row of these traditional garden staples can transform any outdoor space into a breathtaking display of color and elegance. While the allure of more hydrangeas is undeniable, the cost of purchasing numerous mature plants can quickly add up. But what if there was a way to significantly expand your hydrangea collection without breaking the bank? The answer lies in a simple, incredibly rewarding technique: propagating hydrangeas from cuttings.
This method not only offers a cost-effective solution but also allows you to multiply your favorite varieties, ensuring each new plant is an exact replica of its parent. Far from being a complex gardening secret, learning How To Propagate Hydrangeas From Cuttings is an accessible skill that brings immense satisfaction and a continuous supply of these gorgeous blooms.
Unlock a Garden Full of Hydrangeas: Why Propagate from Cuttings?
Beyond the sheer joy of watching a new plant sprout from a mere stem, propagating hydrangeas from cuttings offers several compelling advantages for any gardener:
- Significant Cost Savings: Hydrangea plants, especially larger ones, can be quite expensive. By taking cuttings from an existing bush – whether your own or a friend’s – you can grow an entirely new plant for pennies, saving a substantial amount of money.
- Exact Replicas: Unlike growing from seed, which can result in variations, cuttings produce clones of the parent plant. This means your new hydrangeas will share the same flower color, size, and growth habit as the original, ensuring you maintain your favorite characteristics.
- Learn a New Skill: Mastering plant propagation is a fundamental gardening skill that builds confidence and expands your horticultural repertoire. It’s an empowering journey from a simple stem to a thriving plant.
- Multiply Your Favorites: If you have a hydrangea variety you absolutely adore, propagation allows you to easily multiply it, spreading its beauty throughout your garden or sharing it with fellow enthusiasts.
Timing is Everything: When to Propagate Hydrangea Cuttings for Success
For a successful propagation journey, choosing the right moment is paramount. Hydrangeas are most receptive to rooting during their active growing season. Understanding this crucial window will dramatically increase your success rate.
The ideal time to propagate hydrangeas from cuttings is typically during late spring to early summer. Specifically, from late June to early July is often cited as the sweet spot. During these months, the new growth on the hydrangea plant is robust enough to sustain itself but still tender and flexible, packed with the hormones necessary for root development. This semi-hardwood stage is perfect because the stems aren't too soft (which can rot easily) nor too woody (which roots slowly, if at all).
It's vital to avoid taking cuttings during extreme temperatures. Very hot weather can stress young cuttings, leading to rapid dehydration and failure. Conversely, cold weather will significantly hinder root development, slowing down the process or preventing it altogether. Additionally, refrain from propagating when the hydrangea is actively blooming. When a plant is flowering, its energy is primarily directed towards sustaining those blooms, not on vegetative growth or root formation. A cutting taken at this time will prioritize trying to flower rather than developing a strong root system, ultimately diminishing your chances of success. For more in-depth insights into optimal timing, consider reading our guide on Master Hydrangea Propagation: Best Time & Tips for Cuttings.
Step-by-Step: How To Propagate Hydrangeas From Cuttings Like a Pro
Now that we’ve covered the why and when, let’s delve into the practical steps of propagating hydrangeas from cuttings. Follow this guide, and you’ll be well on your way to a garden full of new hydrangea plants.
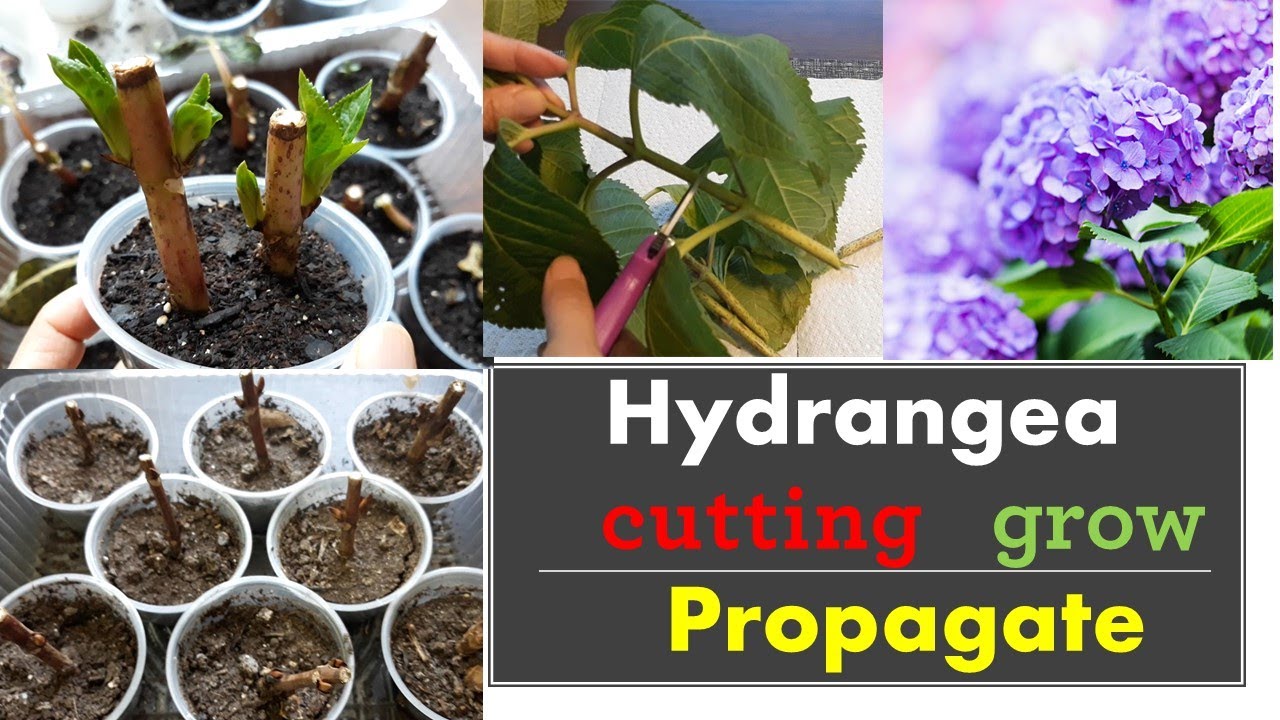
1. Selecting and Preparing Your Cuttings
The success of your propagation effort begins with selecting the right stem. Choose a healthy, vigorous stem from new growth that hasn't bloomed yet. Look for one that is vibrant green, flexible but firm – it should bend slightly without snapping. Avoid overly woody stems from older growth or extremely soft, new shoots that are too tender.
- Length and Cut: Using sharp, clean pruning shears (sterilizing them with rubbing alcohol helps prevent disease), cut a section about 4-6 inches long. Make your cut just below a leaf node, which is the slightly swollen bump where a leaf or branch emerges. This area contains a high concentration of growth hormones vital for root initiation. Ensure your cutting includes at least two to three leaf nodes.
- Remove Lower Leaves: Gently strip off all leaves from the bottom two-thirds of your cutting. This prevents moisture loss through transpiration and, crucially, keeps foliage out of the soil, which could lead to rot.
- Trim Upper Leaves (Optional but Recommended): If the remaining leaves at the top are very large, you can trim them in half horizontally. This further reduces water loss and helps the cutting focus its energy on rooting rather than maintaining large leaf surfaces.
2. The Rooting Process: Planting for Success
With your cuttings prepared, it's time to set them up for rooting.
- Apply Rooting Hormone: Dip the cut end of each stem into a rooting hormone (available in powder or gel form). This step isn't strictly necessary for all hydrangea varieties, but it significantly boosts your chances of success by stimulating root development. Gently tap off any excess powder.
- Prepare Your Potting Medium: Use a sterile, well-draining potting mix. A seed-starting mix or a blend of peat moss and perlite/vermiculite (50/50 ratio) works wonderfully. Ensure the mix is moist but not waterlogged. Good drainage is critical to prevent rot.
- Plant the Cuttings: Using a pencil or a stick, create small holes in the potting mix. Carefully insert each cutting into a hole, ensuring that at least one node is buried beneath the soil surface. Gently firm the soil around the base of each cutting to ensure good contact. You can plant several cuttings in one pot, but ensure they don't touch each other.
- Create a Humid Environment: Hydrangea cuttings thrive in high humidity. You can achieve this by covering the pot with a clear plastic dome, a plastic bag, or placing it inside a propagation tray with a lid. Use stakes or chopsticks to prevent the plastic from touching the leaves. This mini-greenhouse effect traps moisture and encourages rooting.
3. Nurturing Your New Hydrangeas
Patience and consistent care are key during the rooting phase.
- Light and Temperature: Place your potted cuttings in a location that receives bright, indirect light. Avoid direct sunlight, which can scorch the tender leaves and overheat the mini-greenhouse. Maintain a consistent room temperature, ideally between 65-75°F (18-24°C).
- Moisture Management: Keep the potting mix consistently moist but never soggy. Check the moisture daily and mist the leaves occasionally if the humidity cover allows, or if you temporarily remove it. Ensure adequate air circulation by briefly opening the plastic cover every few days to prevent mold and fungal growth.
- Signs of Rooting: In about 2-4 weeks, you should start seeing signs of new growth, such as tiny new leaves appearing at the top of the cutting. This is a good indicator that roots are forming. You can also gently tug on a cutting; if it offers resistance, it has likely rooted.
- Transplanting: Once your new hydrangea plants have developed a robust root system (typically after 4-6 weeks) and show significant new foliage, they are ready to be transplanted. Carefully pot each rooted cutting into its own larger container (e.g., a 4-inch pot) using a general-purpose potting mix. Continue to keep them in a protected environment with indirect light as they establish.
Expert Tips for a Higher Success Rate
- Sterilize Your Tools: Always use sharp, clean pruning shears. Sterilizing them with rubbing alcohol before each use prevents the spread of diseases.
- Don't Overwater: While humidity is important, waterlogging the soil will lead to rot. Ensure your pots have drainage holes.
- Patience is a Virtue: Rooting takes time. Don't be discouraged if some cuttings don't make it or if the process seems slow. Some varieties root faster than others.
- Provide Bottom Heat: Using a heating mat under your propagation tray can provide gentle bottom heat, which encourages faster root development.
- Acclimatize Gradually: Before planting your young hydrangeas outdoors, gradually acclimate them to outdoor conditions. This "hardening off" process involves slowly exposing them to increasing periods of outdoor light, wind, and temperature fluctuations over 7-10 days.
- Consider Different Hydrangea Types: While this guide applies to most hydrangeas, some types like Bigleaf (Hydrangea macrophylla) or Panicle (Hydrangea paniculata) are generally easier to root than Oakleaf (Hydrangea quercifolia).
Propagating hydrangeas from cuttings is a truly rewarding endeavor. Not only will you save money and gain a valuable gardening skill, but you'll also fill your garden with beautiful, thriving hydrangeas, each a testament to your green thumb. With a little care and patience, you can turn a single hydrangea bush into a magnificent display of color, transforming your outdoor space into the garden of your dreams.