Master Hydrangea Propagation: Best Time & Tips for Cuttings
Hydrangeas, with their magnificent clusters of blooms, are timeless garden favorites. From vibrant blues and purples to classic whites and romantic pinks, these commercial flowering shrubs can transform any landscape into a breathtaking display. While seeds might offer a chance at new life, they often fail to produce plants true to their parent variety. If you dream of expanding your collection of specific hydrangea types, or simply want to replicate that stunning specimen in your neighbor's yard, mastering **how to propagate hydrangeas from cuttings** is an invaluable skill.
Propagating hydrangeas from cuttings is not only incredibly satisfying but also a highly cost-effective way to multiply your favorite bushes. Imagine filling your garden borders with dozens of robust, genetically identical hydrangeas, all for the price of one established plant – or even for free, using a cutting from a friend! This guide will walk you through the optimal timing and practical steps to ensure a high success rate, turning you into a hydrangea propagation expert.
Why Propagate Hydrangeas from Cuttings? Unlocking Garden Abundance
Beyond the sheer joy of growing new plants, propagating hydrangeas from cuttings offers several compelling advantages:
- True to Type Replication: Unlike growing from seeds, which can lead to genetic variations, cuttings produce exact replicas of the parent plant. This means you can reliably duplicate your favorite varieties, ensuring they retain their unique flower color, size, and growth habit.
- Cost-Effective Garden Expansion: Purchasing mature hydrangea plants can be expensive, especially if you envision a large display. Cuttings allow you to multiply your existing plants or those of a generous friend without breaking the bank.
- Preserving Prized Varieties: If you have an old, cherished hydrangea bush that’s showing signs of decline, taking cuttings is an excellent way to ensure its legacy lives on.
- Learning a New Skill: Plant propagation is a rewarding horticultural skill that deepens your understanding of plant life cycles. Success with hydrangeas can open the door to propagating many other shrubs and perennials.
- High Success Rate: Compared to some other woody plants, hydrangeas are relatively easy to propagate from cuttings, making them an excellent choice for beginners.
This method allows you to cultivate an impressive array of these popular shrubs, filling your garden with vibrant color and lush foliage. To learn more about maximizing your hydrangea collection for less, explore our
Grow More Hydrangeas for Less: Easy Cutting Propagation Guide.
The Optimal Window: When to Propagate Hydrangea Cuttings
Timing is arguably the most crucial factor for successful hydrangea propagation. Choosing the right moment significantly increases the chances of your cuttings developing roots and thriving.
Identifying the Active Growing Season
For most hydrangea varieties, the ideal time to take cuttings is during their active growing season. This typically falls from **late spring to early summer**. During this period, the plant is vigorously producing new, tender growth that hasn't yet hardened into woody stems. This fresh growth contains the optimal balance of hormones for root development.
More specifically, the sweet spot for many gardeners is from **late June to early July**. At this point, the new shoots are still pliable and green, but they've gained enough strength and maturity to be firm. This "tender but firm" stage is key because overly soft, brand-new growth can be prone to rot, while overly woody, mature stems may struggle to root at all.
What to Avoid
To maximize your success when learning **how to propagate hydrangeas from cuttings**, it’s equally important to know when *not* to take them:
- Extreme Temperatures: Avoid taking cuttings during the hottest parts of summer or the coldest periods of fall and winter. High heat can stress the delicate cuttings, leading to wilting and failure, while cold temperatures will hinder root development entirely.
- Blooming Period: Never take cuttings from a hydrangea that is currently in bloom. When a plant is flowering, its energy is primarily directed towards sustaining those blossoms and producing seeds. A cutting taken at this time will prioritize its existing flowers over developing new roots, severely reducing your chances of success. Wait until after the flowering cycle has completed and new vegetative growth has emerged.
By carefully observing your hydrangea plants and timing your propagation efforts to coincide with their peak growth, you lay the foundation for a flourishing batch of new plants.
Step-by-Step Guide: How To Propagate Hydrangeas From Cuttings
Once you’ve identified the perfect time, the actual process of taking and preparing your cuttings is straightforward.
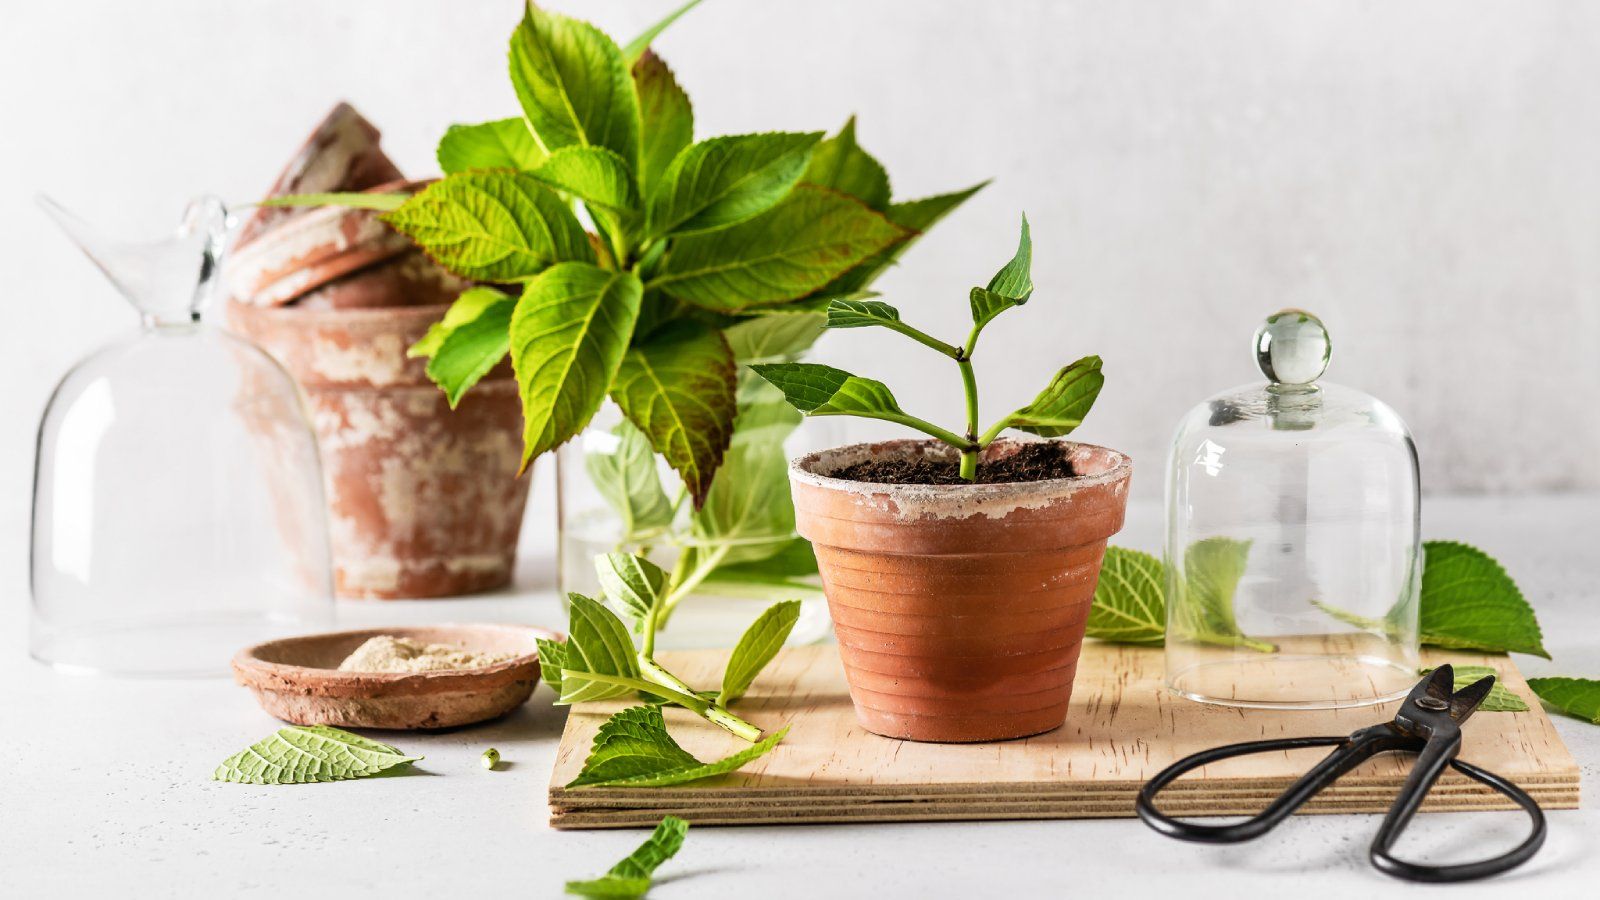
1. Selecting and Preparing Your Cuttings
The journey to new hydrangeas begins with the selection of a healthy, vigorous stem from a disease-free parent plant.
- Choose the Right Stem: Look for new growth that is green and flexible, bending slightly without snapping. It should not be too young and soft (flimsy) or too old and woody. Crucially, select a stem that has **not yet bloomed**.
- Identify Nodes: Nodes are the points on the stem where leaves or branches emerge. These areas contain concentrated plant hormones vital for root development.
- Make the Cut: Using sharp, clean pruning shears or a knife (sterilize them with rubbing alcohol before and after use to prevent disease spread), cut a section of stem approximately 4-6 inches long. Make your cut just below a node. This cut should be clean and smooth, not crushed or jagged. Ensure your cutting includes at least two to three sets of leaves/nodes.
2. Preparing the Cuttings for Rooting
Once you have your fresh cuttings, a few simple preparations will enhance their rooting potential.
- Remove Lower Leaves: Carefully strip off the leaves from the bottom 2-3 inches of the cutting. This prevents too much moisture loss through transpiration and ensures no foliage is buried in the planting medium, which could lead to rot.
- Trim Remaining Leaves: If the remaining leaves at the top are very large, you can trim them in half horizontally. This further reduces moisture loss and helps the cutting conserve energy for root production.
- Optional: Score the Stem: For some woody cuttings, lightly scraping a small section of the outer skin at the very bottom of the stem (where the leaves were removed) can expose more cambium layer and encourage rooting.
- Apply Rooting Hormone: This step isn't strictly necessary for hydrangeas, as they often root readily, but it significantly boosts success rates. Dip the cut end of the stem into rooting hormone powder or liquid. Tap off any excess to prevent over-application, which can sometimes hinder rather than help.
3. Planting Your Cuttings
Now, your prepared cuttings are ready for their new home.
- Choose Your Medium: A sterile, well-draining potting mix designed for seed starting or propagation is ideal. A mix of peat moss and perlite or vermiculite works wonderfully, providing aeration and moisture retention. Avoid heavy garden soil.
- Prepare Containers: Small pots, cell trays, or even repurposed plastic containers with drainage holes are suitable. Fill them with your chosen potting mix and moisten it thoroughly.
- Plant the Cuttings: Using a pencil or a stick, create a small hole in the potting mix. Gently insert the prepared cutting into the hole, ensuring at least one node is buried beneath the surface. Firmly but gently press the soil around the base of the cutting to ensure good contact. You can plant multiple cuttings in one larger container, spacing them a few inches apart.
4. Creating the Ideal Rooting Environment
The environment you provide is critical for encouraging root development.
- Humidity is Key: Cuttings lack roots to absorb water, so high humidity is essential to prevent wilting. You can create a mini-greenhouse effect by placing a clear plastic bag over the pot, using a propagation dome, or placing the cuttings in a humidity tray. Ensure the plastic doesn't touch the leaves by using stakes.
- Bright, Indirect Light: Place your cuttings in a location that receives plenty of bright, indirect sunlight. Direct, harsh sun can scorch the delicate leaves and dry out the cuttings.
- Consistent Moisture: Keep the potting medium consistently moist but never waterlogged. Overwatering can lead to rot. Regularly check the moisture level and mist the leaves daily, especially if not using a humidity dome.
- Stable Temperature: Maintain a consistent, moderate temperature, ideally between 65-75°F (18-24°C). Avoid drastic temperature fluctuations.
- Air Circulation: If using a plastic bag or dome, open it for an hour or two each day to allow for air circulation, which helps prevent fungal issues.
5. Patience and Monitoring
Rooting takes time, so patience is a virtue!
- Signs of Success: Within 2-4 weeks, you should start seeing signs of new growth – tiny leaves emerging from the top nodes. This is a good indication that roots are forming.
- The Tug Test: After a few weeks, you can gently tug on a cutting. If you feel resistance, it means roots have developed and are anchoring the plant.
- Troubleshooting: If cuttings wilt significantly, increase humidity or check soil moisture. If they turn black and mushy, it's likely rot due to overwatering or poor air circulation.
For a more visual and detailed walkthrough, consider our
Propagate Hydrangeas from Cuttings: A Step-by-Step DIY Skill guide.
6. Transplanting Your New Hydrangeas
Once your cuttings have developed a robust root system and show healthy new foliage, they are ready for their next stage of growth.
- Hardening Off: Before moving them permanently outdoors, especially if they’ve been in a protected environment, gradually acclimate them to outdoor conditions. Over a week or two, expose them to increasing periods of outdoor light and temperature fluctuations.
- Move to Larger Containers or Garden: Once hardened off, transplant them into larger individual pots filled with a good quality potting mix, or directly into a prepared garden bed. Ensure the soil is well-draining and enriched with organic matter.
- Ongoing Care: Continue to water regularly, protect from extreme weather, and provide appropriate nutrients as they grow into mature, blooming hydrangea bushes.
Cultivating Your Own Hydrangea Haven
Learning **how to propagate hydrangeas from cuttings** is a rewarding and accessible skill that empowers you to multiply your favorite plants and create the garden of your dreams. From selecting the perfect stem during late spring to early summer, to nurturing your cuttings in a humid environment, each step brings you closer to a bountiful display of these magnificent flowers. With a little patience and attention to detail, you'll soon enjoy the satisfaction of seeing your garden flourish with hydrangeas you’ve grown yourself, proving that true beauty often starts from the simplest beginnings.